How to Add Mentions and Hashtags in React using react-mentions [Full Tutorial]
# And @ In React Apps
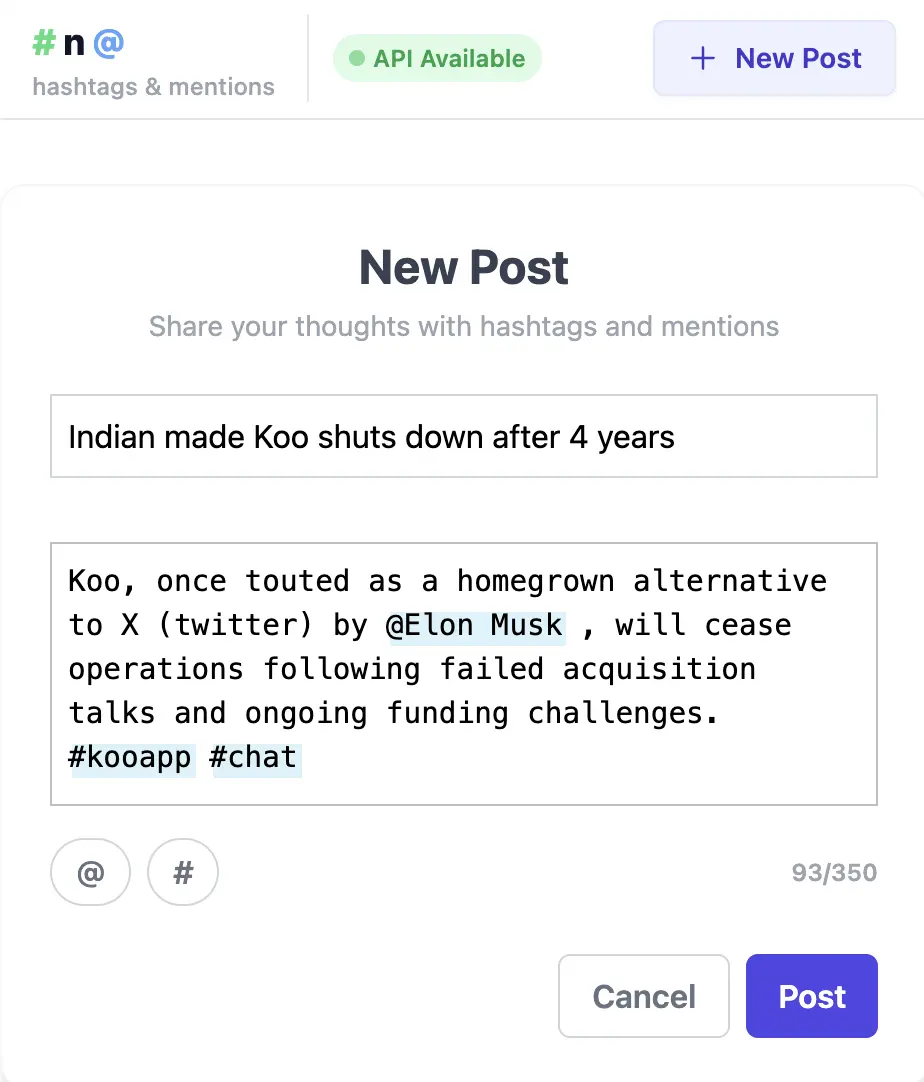
There are many use cases in real-world applications where you need to implement triggers — like showing a list of users when typing the @ symbol or adding a hashtag with #. If you’re wondering how to add mentions in React using react-mentions, this blog will walk you through the process step-by-step.
Want to give it a try ? Here is deployed version https://hashtags-n-mentions.netlify.app.
Update (2025): If you’re using TypeScript or looking for the latest best practices, check out my new post — React Mentions Implementation Guide with TypeScript in 2025. It covers the modern setup and improvements since this tutorial was first published.
Prerequisites
What We Will Be Using
Vite (instead of Create React App)
ReactJS
Functional components with hooks
Tailwind CSS for styling
NPM package called react-mentions
Backend API to fetch posts, users, tags, and create posts. (No worries, I have already created the API)
Now let’s get our hands dirty!
Setup React Project
Create react app using vite:
npm create vite@latest hashtags-and-mentions-in-react -- --template reactMove into the created project:
cd hashtags-and-mentions-in-reactInstall required dependencies:
npm install react-router-dom axios react-mentions html-react-parserInstall TailwindCSS and configure it in our app:
You can refer to their doc - https://tailwindcss.com/docs/installation/using-vite
npm install tailwindcss @tailwindcss/vitevite.config.js 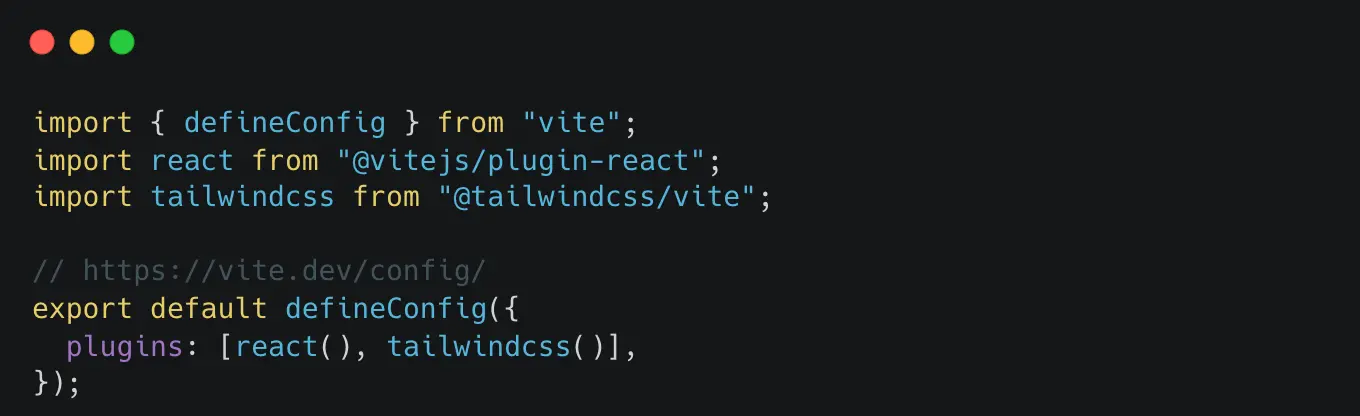
Once it is done, lets start the show ?
npm run devWe will create the UI first then implement functionality ;-)
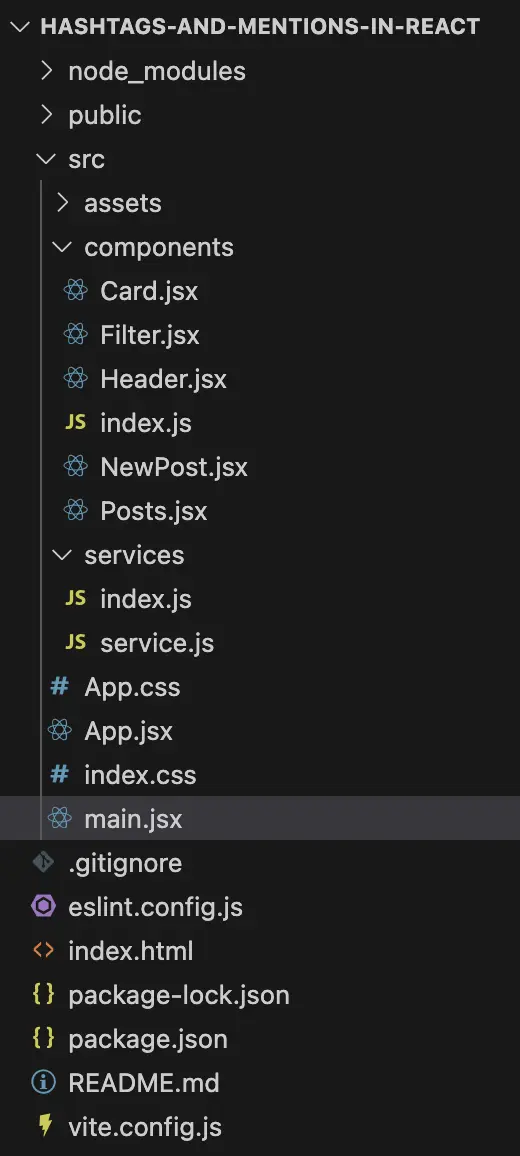
This is the folder structure of our final application
App.jsx
import { BrowserRouter, Route, Routes } from 'react-router-dom'

import { Filter, Header, NewPost, Posts } from '/components'

function App() {
  return (
    <BrowserRouter>
      <Header />
      <Routes>
        <Route
          path="/"
          element={(
            <section className="px-4 pb-4 pt-4 space-y-4 lg:px-4 sm:px-6 xl:px-6 lg:pb-4 sm:pb-6 xl:pb-6">
              <Filter />
              <Posts />
            </section>
          )}
        />
        <Route path="/new" element={<NewPost />} />
      </Routes>

    </BrowserRouter>
  )
}

export default App
components/index.js
export { default as Card } from './Card'
export { default as Filter } from './Filter'
export { default as Header } from './Header'
export { default as NewPost } from './NewPost'
export { default as Posts } from './Posts'
Let start creating these components now.
components/Header.jsx
import { Link } from 'react-router-dom'

function Header() {
  return (
    <header className="flex items-center justify-between">
      <Link to="/">
        <h2 className="px-4 py-2 text-lg text-black font-medium leading-6">
          <span className="text-green-400">#</span>
          n
          <span className="text-blue-400">@</span>
        </h2>
      </Link>
      <Link
        to="/new"
        className="group flex items-center rounded-md bg-light-blue-100 px-4 py-2 text-sm text-light-blue-600 font-medium hover:bg-light-blue-200 hover:text-light-blue-800"
      >
        New
      </Link>
    </header>
  )
}

export default Header
components/Filter.jsx
function Filter() {
  return (
    <form className="relative">
      <svg
        width="20"
        height="20"
        fill="currentColor"
        className="absolute left-3 top-1/2 transform text-gray-400 -translate-y-1/2"
      >
        <path
          fillRule="evenodd"
          clipRule="evenodd"
          d="M8 4a4 4 0 100 8 4 4 0 000-8zM2 8a6 6 0 1110.89 3.476l4.817 4.817a1 1 0 01-1.414 1.414l-4.816-4.816A6 6 0 012 8z"
        />
      </svg>
      <input
        className="w-full border border-gray-200 rounded-md py-2 pl-10 text-sm text-black focus:outline-none focus:ring-1 focus:ring-light-blue-500 placeholder-gray-500"
        type="text"
        aria-label="Filter posts"
        placeholder="Filter posts"
      />
    </form>
  )
}

export default Filter
services/service.js
import axios from 'axios'

const instance = axios.create({
  baseURL:
    import.meta.env.VITE_SERVER_API
      || 'https://hashtags-and-mentions-server.onrender.com/api',
  headers: { 'Content-Type': 'application/json' },
  timeout: 1000 * 8, // Wait for request to complete in 8 seconds
})

export default instance
Here we have created an instance from axios so that next time we do not have to pass baseURL and headers in every request.
services/index.js
export { default as APIservice } from './service'components/Posts.jsx
import { useEffect, useState } from 'react'
import { Link } from 'react-router-dom'
import { APIservice } from '../services'

import Card from './Card'

function Posts() {
  const [posts, setPosts] = useState([])

  useEffect(() => {
    getPosts()
  }, [])

  async function getPosts() {
    try {
      const res = await APIservice.get('/posts')
      setPosts(res.data.posts)
    }
    catch (error) {
      console.error(error)
    }
  }

  return (
    <ul className="grid grid-cols-1 gap-4 lg:grid-cols-3 sm:grid-cols-2 xl:grid-cols-2">
      {posts && posts.length > 0
        ? posts
            .sort((a, b) => b.createdAt - a.createdAt)
            .map(post => (
              <Card key={post._id} title={post.title} content={post.content} />
            ))
        : null}
      <li className="flex rounded-lg hover:shadow-lg">
        <Link
          to="/new"
          className="hover:shadow-xs w-full flex items-center justify-center border-2 border-gray-200 rounded-lg border-dashed py-4 text-sm font-medium hover:border-gray-300"
        >
          New Post
        </Link>
      </li>
    </ul>
  )
}

export default Posts
Here we are getting the posts from the server in useEffect, and we are populating that data to our state posts using setPosts.
Later in the return statement we are checking if there are posts and then sorting posts based on created time.
Finally the posts are rendered in the Card component which takes title and content as props.
components/Card.jsx
import parse from 'html-react-parser'
import { Link } from 'react-router-dom'

function Card({ title, content }) {
  return (
    <li className="flex flex-col gap-2 border border-gray-100 rounded-xl bg-white p-5 shadow-sm transition-shadow hover:shadow-md">
      <div className="mb-1">
        <span className="line-clamp-2 text-lg text-gray-900 font-semibold">
          {title}
        </span>
      </div>
      <div className="break-words text-sm text-gray-700 leading-relaxed">
        {parse(content, {
          replace: (domNode) => {
            if (domNode.name === 'a') {
              const node = domNode.children[0]
              return (
                <Link
                  to={domNode.attribs.href}
                  className={
                    node.data && node.data[0] === '#'
                      ? 'text-green-500 font-medium hover:underline'
                      : 'text-blue-500 font-medium hover:underline'
                  }
                >
                  {node.data}
                </Link>
              )
            }
          },
        })}
      </div>
    </li>
  )
}

export default Card
Important thing to note in this component is the parse which we have imported from html-react-parser. We are parsing our content so that if we get an anchor tag(a href), we replace it with Link (from react-router-dom) else the anchor tag will refresh the whole page on click.
By the way, these anchor tags (now Link) are the hashtags or mentions. Now you can create dynamic routes like /tags/:tag_name or /user/:user_id to show relevant data.
index.css
/* ./src/index.css */
@import "tailwindcss";

.mentions--singleLine .mentions__control {
  display: inline-block;
}
.mentions--singleLine .mentions__higlighter {
  padding: 1px;
  border: 2px inset transparent;
}
.mentions--singleLine .mentions__input {
  padding: 5px;
  border: 2px inset;
}
.mentions--multiLine .mentions__control {
  font-family: monospace;
  font-size: 11pt;
  border: 1px solid silver;
}
.mentions--multiLine .mentions__highlighter {
  padding: 9px;
}
.mentions--multiLine .mentions__input {
  padding: 9px;
  min-height: 63px;
  outline: 0;
  border: 0;
}
.mentions__suggestions__list {
  background-color: white;
  border: 1px solid rgba(0, 0, 0, 0.15);
  font-size: 10pt;
}
.mentions__suggestions__item {
  padding: 5px 15px;
  border-bottom: 1px solid rgba(0, 0, 0, 0.15);
}
.mentions__suggestions__item--focused {
  background-color: #cee4e5;
}
.mentions__mention {
  background-color: #cee4e5;
}
components/NewPost.jsx
import { useEffect, useRef, useState } from 'react'
import { Mention, MentionsInput } from 'react-mentions'
import { Link, useNavigate } from 'react-router-dom'

import { APIservice } from '../services'

function NewPost() {
  const [title, setTitle] = useState('')
  const [content, setContent] = useState('')
  const [users, setUsers] = useState([])
  const [tagNames, setTagNames] = useState([])
  const myInput = useRef()
  const navigate = useNavigate()

  useEffect(() => {
    getActors()
  }, [])

  function addContent(input) {
    if (input.length <= 350) {
      setContent(input)
    }
  }

  async function getActors() {
    const res = await APIservice.get(`/users`)
    // Transform the users to what react-mentions expects
    const usersArr = []
    res.data.users.map(item =>
      usersArr.push({
        id: item._id,
        display: item.name,
      })
    )
    setUsers(usersArr)
  }

  async function asyncTags(query, callback) {
    if (!query)
      return

    APIservice.get(`/tag/search?name=${query}`)
      .then((res) => {
        if (res.data.tags.length) {
          const suggestion = { id: query, display: query }
          const tagsArray = res.data.tags.map(tag => ({
            id: tag._id,
            display: tag.name,
          }))
          return [...tagsArray, suggestion]
        }
        else {
          return [{ id: query, display: query }]
        }
      })
      .then(callback)
  }

  async function savePost(e) {
    e.preventDefault()

    let newContent = content

    newContent = newContent.split('@@@__').join('<a href="/user/')
    newContent = newContent.split('^^^__').join(`">@`)
    newContent = newContent.split('@@@^^^').join('</a>')

    newContent = newContent.split('$$$__').join('<a href="/tag/')
    newContent = newContent.split('~~~__').join(`">#`)
    newContent = newContent.split('$$$~~~').join('</a>')
    if (newContent !== '') {
      const body = newContent.trim()
      // Call to your DataBase like backendModule.savePost(body,  along_with_other_params);
      tagNames.map(async (tag) => {
        try {
          await APIservice.post('/tag', {
            name: tag,
          })
        }
        catch (error) {
          console.log(error)
        }
      })
      console.log(body)
      try {
        await APIservice.post('/post', {
          title,
          content: body,
          createdAt: new Date().getTime(),
        })
        navigate('/')
      }
      catch (error) {
        console.error(error)
      }
    }
  }

  return (
    <div className="flex items-center justify-center py-8">
      <form
        onSubmit={savePost}
        className="max-w-xl w-full flex flex-col gap-4 border border-gray-100 rounded-xl bg-white p-6 shadow-md"
      >
        <div className="mb-2 text-center">
          <h2 className="mb-1 text-2xl text-gray-700 font-bold">New Post</h2>
          <p className="text-sm text-gray-400">
            Share your thoughts with hashtags and mentions
          </p>
        </div>
        <input
          value={title}
          onChange={e => setTitle(e.target.value)}
          className="title mb-4 border border-gray-300 p-2 outline-none"
          spellCheck="false"
          placeholder="Title"
          type="text"
          required
        />
        <>
          <MentionsInput
            singleLine={false}
            className="mentions"
            inputRef={myInput}
            spellCheck="false"
            placeholder="Describe everything about this post here"
            value={content}
            onChange={event => addContent(event.target.value)}
            required
          >
            <Mention
              trigger="@"
              data={users}
              markup="@@@____id__^^^____display__@@@^^^"
              displayTransform={(_, display) => `@${display}`}
              style={{ backgroundColor: '#daf4fa' }}
              appendSpaceOnAdd
            />
            <Mention
              trigger="#"
              data={asyncTags}
              markup="$$$____id__~~~____display__$$$~~~"
              displayTransform={(_, display) => `#${display}`}
              style={{ backgroundColor: '#daf4fa' }}
              onAdd={display => setTagNames(tags => [...tags, display])}
              appendSpaceOnAdd
            />
          </MentionsInput>
        </>
        <div className="flex items-center justify-between text-xs text-gray-500">
          <div className="flex gap-2">
            <button
              type="button"
              onClick={() => {
                myInput.current.focus()
                setContent(content => `${content}@`)
              }}
              className="border border-gray-300 rounded-full px-3 py-1 text-base font-semibold transition hover:bg-gray-100"
            >
              @
            </button>
            <button
              type="button"
              onClick={() => {
                myInput.current.focus()
                setContent(content => `${content}#`)
              }}
              className="border border-gray-300 rounded-full px-3 py-1 text-base font-semibold transition hover:bg-gray-100"
            >
              #
            </button>
          </div>
          <div className="ml-auto text-xs text-gray-400 font-semibold">
            {350 - content.length}
            /350
          </div>
        </div>
        <div className="mt-2 flex justify-end gap-2">
          <Link
            to="/"
            className="border border-gray-300 rounded-md px-4 py-2 text-gray-500 font-semibold transition hover:bg-gray-100"
          >
            Cancel
          </Link>
          <button
            type="submit"
            className="rounded-md bg-indigo-600 px-4 py-2 text-white font-semibold transition hover:bg-indigo-700"
          >
            Post
          </button>
        </div>
      </form>
    </div>
  )
}

export default NewPost
Pretty big component ha?
Actually, this is the component that is the essence of this article, so bear with me some more time ;-) Here we have states for title and content of post which are self explanatory.
users and tagNames are the data which we will get from backend and render on @ and # trigger respectively.
There are two ways in which we can show data to user in React Mention input
- Load data initially (like we did for
usersi.e. in useEffect) - Load data asynchronously (
asyncTagsfunction which will get executed every time tag input changes)
Now have a look at MentionsInput in return statement.
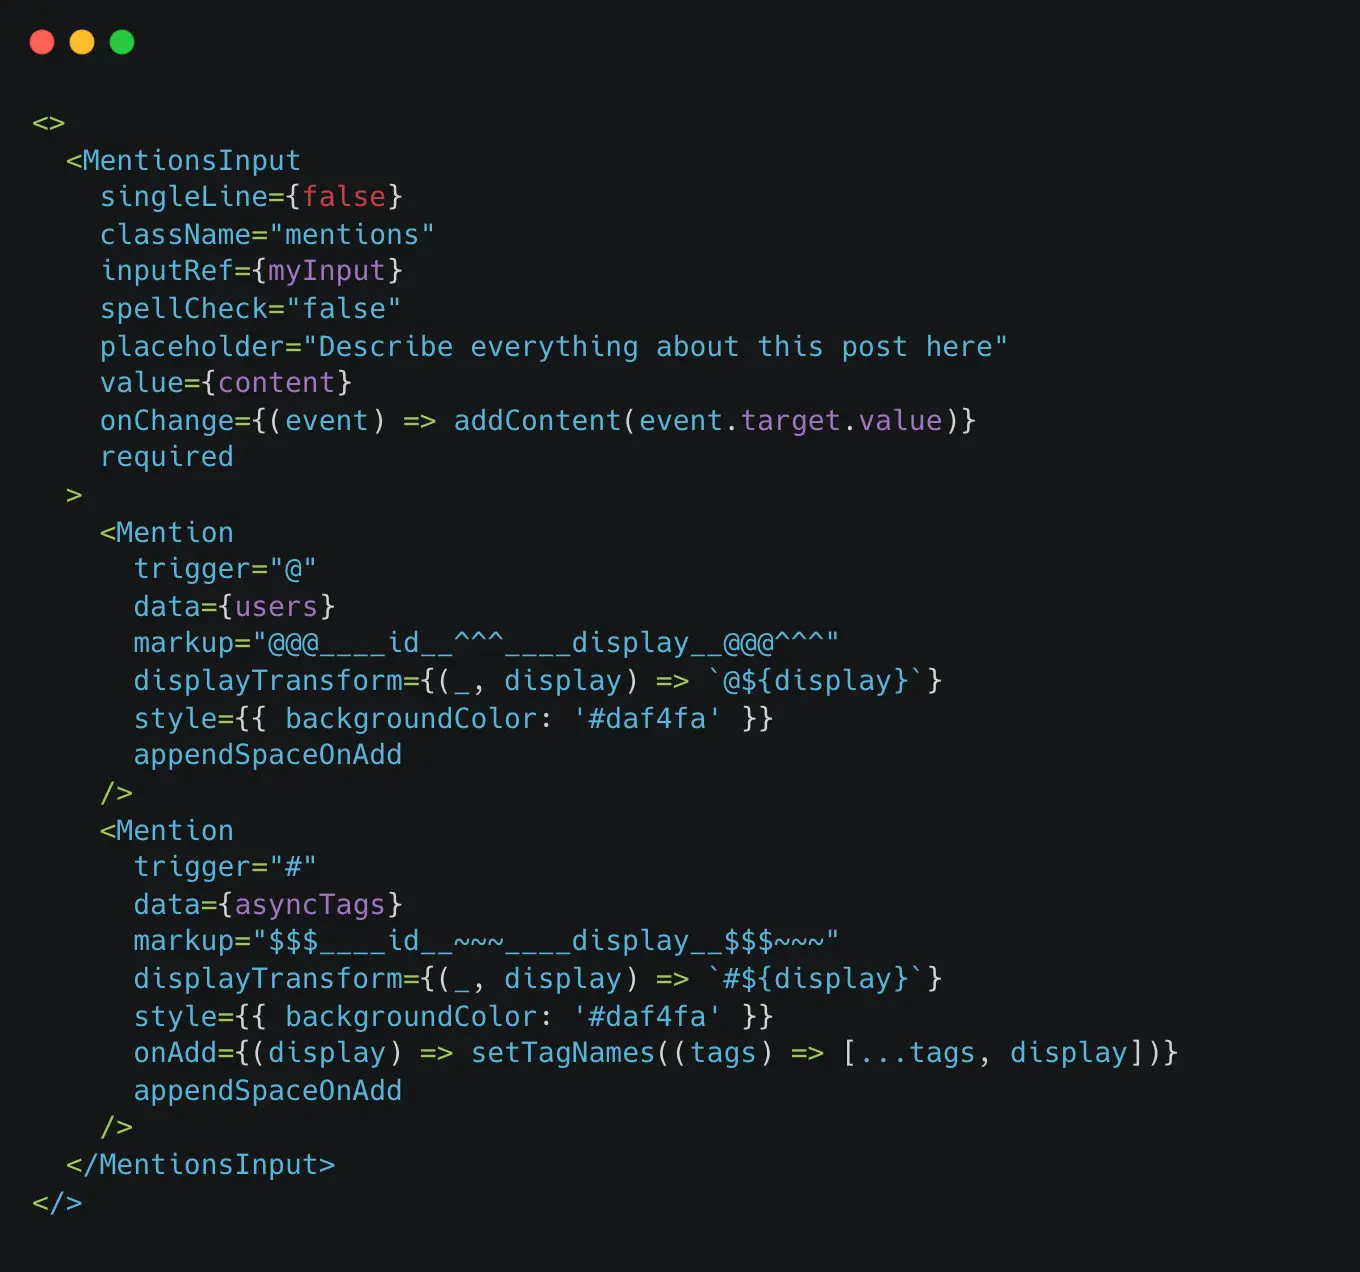
The first thing to note is that MentionsInput is a textarea, so we have given value and set onChange handler for content to it.
The second thing is there are two Mention components inside it which are nothing but the triggers for @ and # respectively.
For every Mention, there are two required things ie trigger(like @ # $..) and data(either static or async) and we are good to go.
Saving to Database
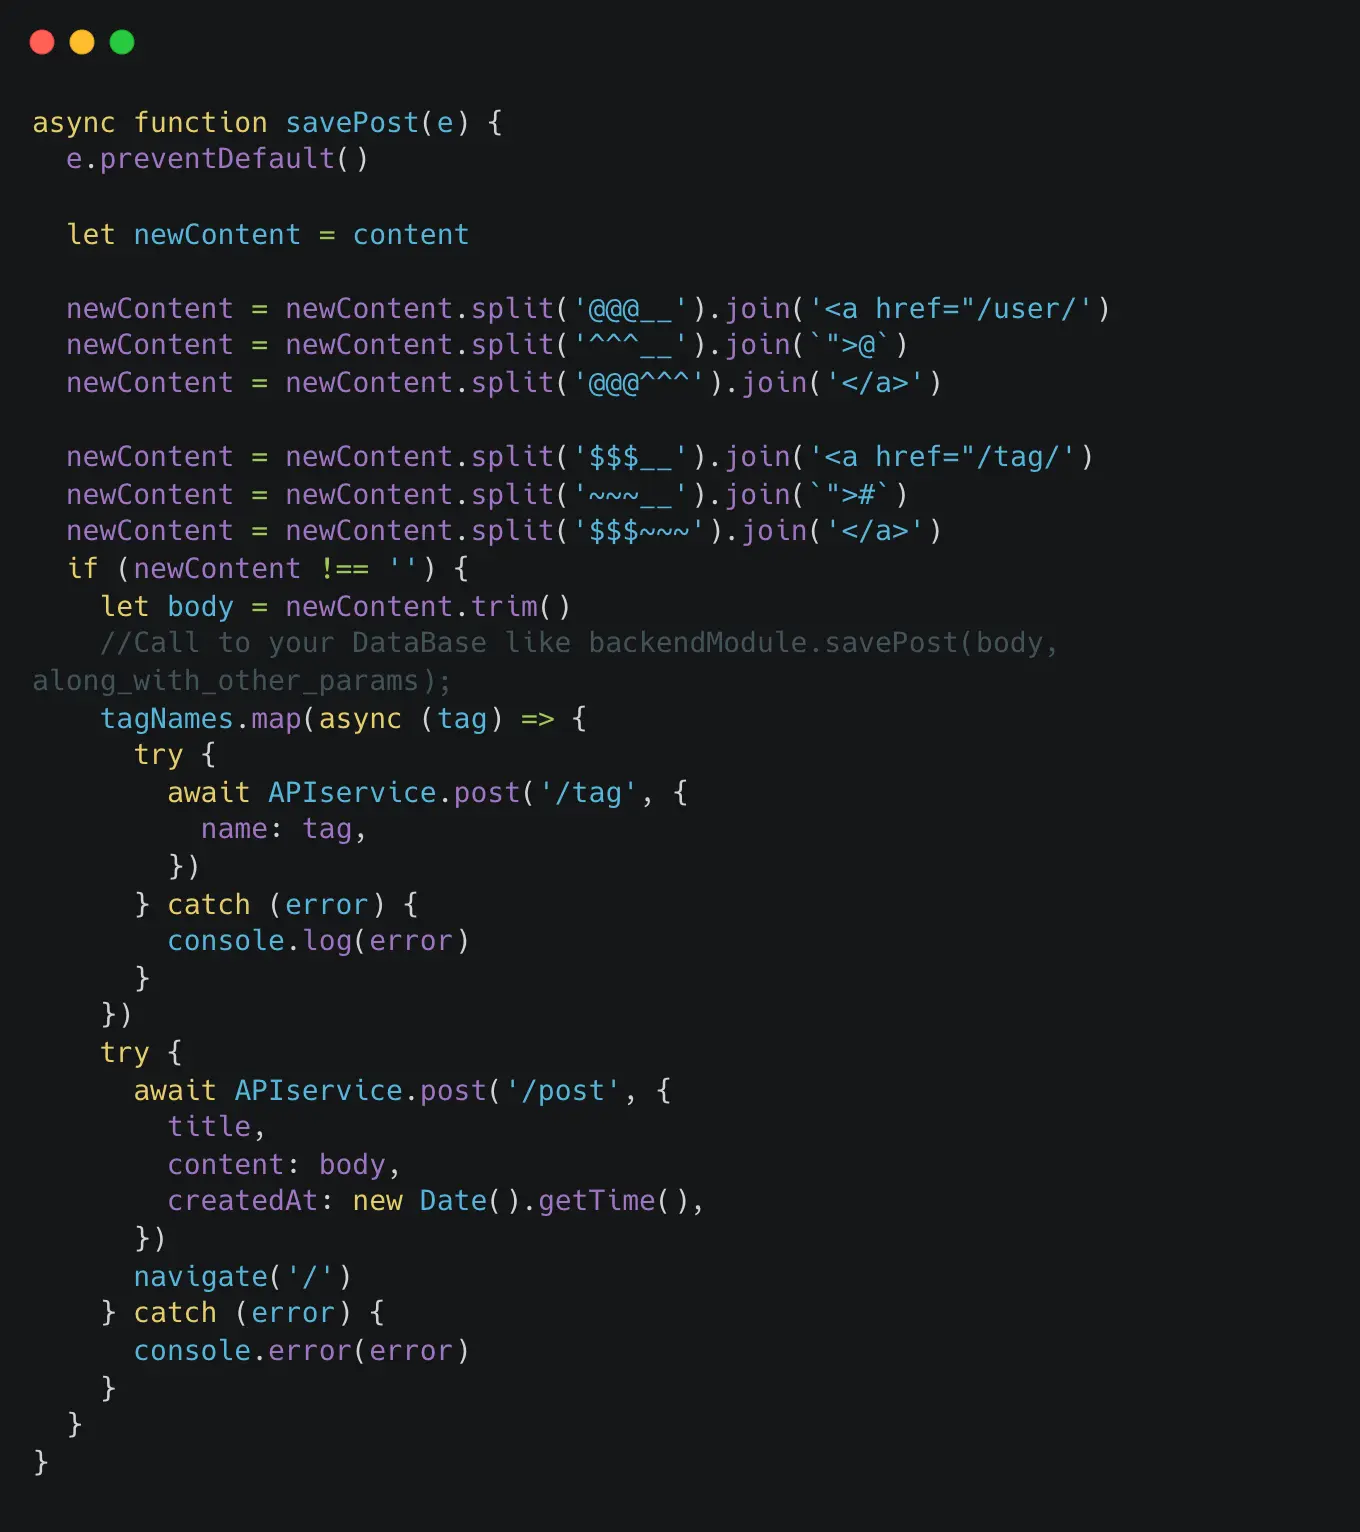
Before saving the data to DB, we will have to handle it so that we can render it correctly later. After extracting the mentions and tags from the content, we save it to DB.
Also, we have called add/tag API so that new tags added by users are saved to DB too.
At the last of code, we have two buttons for adding @ or # by clicking the UI(like linkedin), we have just made a ref of content input, and call
— myInput.current.focus() to focus cursor to content input box
— setContent((content) => content + ”@”) to append @/# after whatever the state of content is.
Github repo link for the above app https://github.com/gauravadhikari1997/hashtags-and-mentions-in-react.
Frequently Asked Questions
What is this tutorial about?
This tutorial provides a comprehensive, step-by-step guide on how to implement mentions (like @user) and hashtags (like #topic) functionality in a React application using the react-mentions library.
What is react-mentions and why is it used in this tutorial?
react-mentions is an NPM package designed to add mention and hashtag capabilities to text input fields in React. It's used here because it simplifies the process of creating interactive triggers (e.g., showing a list of users when '@' is typed) and handling the input transformation.
What are the prerequisites for following this tutorial?
To follow along, you need Node.js (v18 or higher) and npm/yarn installed on your machine, along with a basic understanding of React.js.
How does this tutorial handle saving mentions and hashtags to a database?
The tutorial demonstrates how to transform the react-mentions output, which uses custom markup, into standard HTML anchor tags (<a>) before saving the content to a database. It also shows how new tags added by users are saved to the backend.
How are mentions and hashtags displayed correctly after being saved?
Mentions and hashtags are displayed by parsing the saved HTML content using html-react-parser. The tutorial specifically shows how to replace standard <a> tags with react-router-dom's <Link> component to enable dynamic client-side routing (e.g., /user/:user_id or /tag/:tag_name) without full page refreshes.
Can I see a live demo or the full source code for this implementation?
Yes, the tutorial provides a link to a deployed version of the application at https://hashtags-n-mentions.netlify.app and a GitHub repository link for the full source code at https://github.com/gauravadhikari1997/hashtags-and-mentions-in-react.
Does this solution support both mentions (@) and hashtags (#)?
Yes, the implementation covers both mentions, triggered by the '@' symbol (displaying users), and hashtags, triggered by the '#' symbol (displaying tags).
What styling approach is used in this React mentions and hashtags tutorial?
The tutorial utilizes Tailwind CSS for application styling. It also includes specific custom CSS to style the react-mentions components, such as the input fields, suggestion lists, and the appearance of the highlighted mentions/hashtags.
Is it possible to load mention/hashtag suggestions asynchronously?
Yes, the tutorial demonstrates both ways to load data for suggestions: loading data initially (e.g., for users in useEffect) and loading data asynchronously (e.g., for tags, where suggestions are fetched based on user input via an API call).
Thanks for reading. Hope you like the article and find it useful.
WorkSage Hybrid Work Planner is a web based scheduling tool built for people working in hybrid mode (some days from home, some from office). It helps you plan and balance your “work from office (WFO)” and “work from home (WFH)” days according to what your workplace requires.
Try it now for free →