React Mentions Implementation Guide with TypeScript in 2025
If you are looking to implement mentions and hashtags in your React app, this guide is the one stop for all answers on how to add mentions using the react-mentions library.
I have organized this blog into two parts, first half is beginner friendly which explains the minimal setup to render mentions textarea, its UI customization and styling, and previewing content.
In the next half, we dive deeper into advanced concepts like fetching suggestions from api asynchronously, debouncing, saving new hashtags to database and safely rendering the html content in browser.
Before we move further, note that this tutorial uses React with TypeScript, with Vite as builder.
Let’s start the show now!
Rendering a textarea for mentions using hardcoded data
The simplest way to add mentions or hashtags in your React app is by using the MentionsInput component from the react-mentions library. This is essentially a textarea input field that works like any standard input which it accepts value and onChange props.
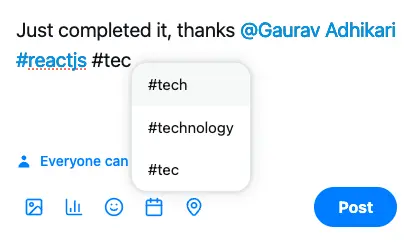
Then to show the suggestions dropdown when typing @ symbol, we have to use Mention component from react-mentions.
Now, to work it as expected, it requires few more attributes to be passed as shown below:
trigger: the symbol which should open suggestions box
data: the array of objects {id, display} to show in suggestions box
displayTransform: how should the selected mention look like
markup: useful to extract mentions from the raw input
appendSpaceOnAdd: if true, adds a space after a mention is selected
Now let’s look at the very basic implementation of mentions in react:
import { useState } from 'react'
import { Mention, MentionsInput } from 'react-mentions'
import './App.css'
function App() {
const [value, setValue] = useState('')
const handleChange = (e: {
target: {
value: string
}
}) => {
setValue(e.target.value)
}
return (
<div>
<h1>Mentions and Hashtags in React</h1>
<MentionsInput
className="mentions"
value={value}
onChange={handleChange}
placeholder="What's on your mind?"
>
<Mention
className="mention"
trigger="@"
data={[
{
id: '1',
display: 'John Doe',
},
{
id: '2',
display: 'Jane Smith',
},
]}
displayTransform={(_: string, display: string) => `@${display}`}
markup="@[__display__](__id__)"
appendSpaceOnAdd
/>
</MentionsInput>
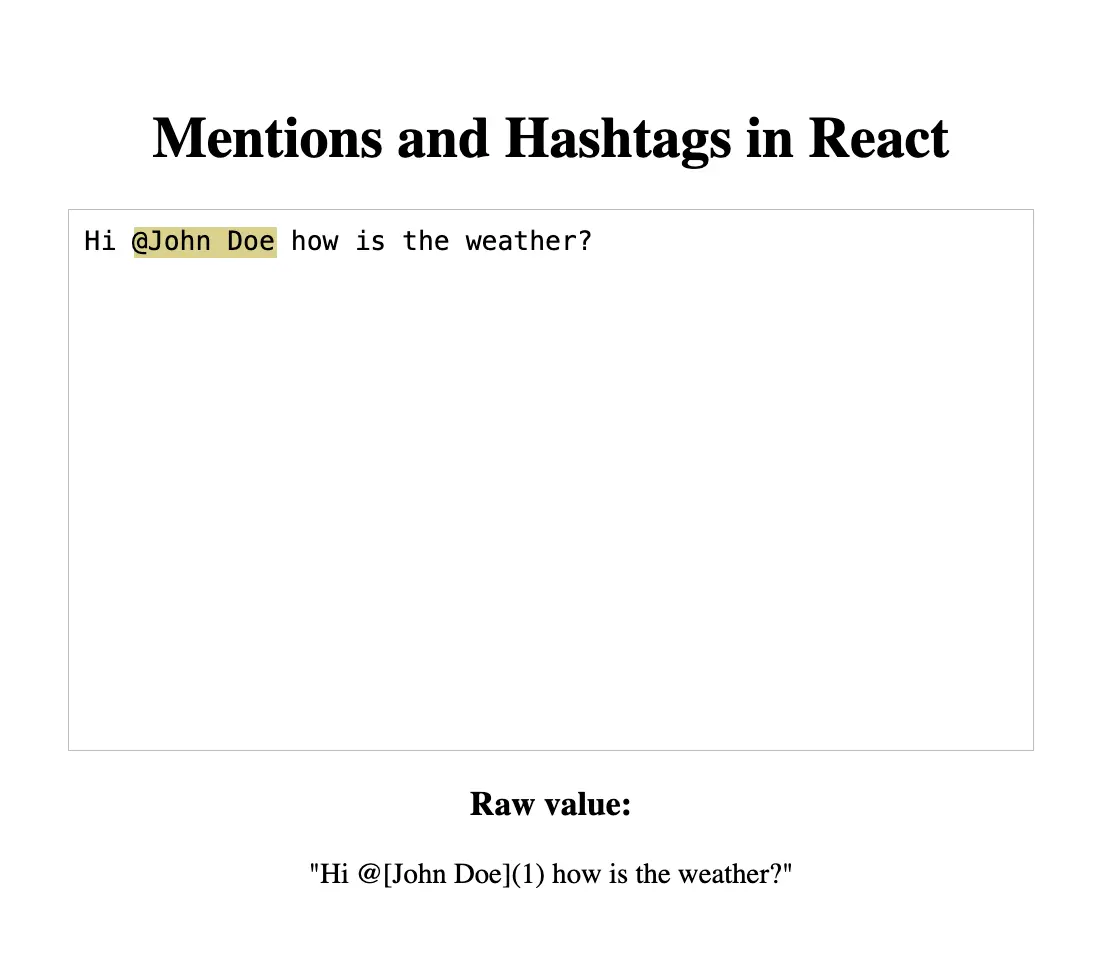
<h3>Raw value:</h3>
<p>{value}</p>
</div>
)
}
export default AppAnd this is what we get, looks cool, right?
Styling the suggestions dropdown list
Just to be on the same page, let me share the css for styling the Mentions. This will be same throughout the tutorial, and we will focus on functionality.
.mentions--singleLine .mentions__control {
  display: inline-block;
}
.mentions--singleLine .mentions__higlighter {
  padding: 1px;
  border: 2px inset transparent;
}
.mentions--singleLine .mentions__input {
  padding: 5px;
  border: 2px inset;
}
.mentions--multiLine .mentions__control {
  font-family: monospace;
  font-size: 11pt;
  border: 1px solid silver;
  height: 300px;
  overflow-y: auto;
}
.mentions--multiLine .mentions__highlighter {
  padding: 9px;
}
.mentions--multiLine .mentions__input {
  padding: 9px;
  min-height: 63px;
  outline: 0;
  border: 0;
}
.mentions__suggestions__list {
  background-color: white;
  border: 1px solid rgba(0, 0, 0, 0.15);
  font-size: 10pt;
}
.mentions__suggestions__item {
  padding: 5px 15px;
  border-bottom: 1px solid rgba(0, 0, 0, 0.15);
}
.mentions__suggestions__item--focused {
  background-color: #dcd185;
}
.mentions__mention {
  background-color: #dcd185;
}
.mention {
  background-color: #dcd185;
}
.suggestion {
  display: flex;
  justify-content: start;
  gap: 10px;
}
Customizing Suggestions with renderSuggestion in react-mentions
We have another prop called renderSuggestion to have more control over how the suggestion list looks like.
Let’s say you want to show an avatar before the username, so this will help.
<Mention
trigger="@"
data={[
{ id: '1', display: 'John Doe', avatar: '👨💻' },
{ id: '2', display: 'Jane Smith', avatar: '👩🎨' }
]}
displayTransform={(_: string, display: string) => `@${display}`}
markup="@[__display__](__id__)"
appendSpaceOnAdd
renderSuggestion={(suggestion) => {
const user = suggestion as User
return (
<div className="suggestion">
<div>{user.avatar}</div>
<div>{user.display}</div>
</div>
)
}}
/>And voila, we get to see the username with avatar now!
Previewing mentions and hashtags as links
Until now we have been viewing the input value as a raw string, but that doesn’t make much sense to the user.
For a good user experience, you should show the mentions as a links, just like we see on platforms like Twitter or LinkedIn, and this is what we are going to achieve in this section.
Let’s first understand how the raw input value is shown, remember we had a markup property in Mention component, that defines how our mention would look like in the raw input.
In our case, it was @[__display__](__id__)" which is why our raw input includes the mentions as @[John Doe](1).
Now, to show these as links, we essentially replace the markup part in the string with html anchor tag. We have also correctly mapped the href of link to the id of user.
const formattedInput = useMemo(() => {
  let formatted = value

  // format mentions
  formatted = formatted.replace(
    /@\[(.+?)\]\((.+?)\)/g,
    (_, display, id) => `<a href="/user/${id}">@${display}</a>`
  )

  return formatted
}, [value])
Finally, to render it on UI, we will simply add this in div as dangerouslySetInnerHTML
<div
  dangerouslySetInnerHTML={{
    __html: formattedInput,
  }}
/>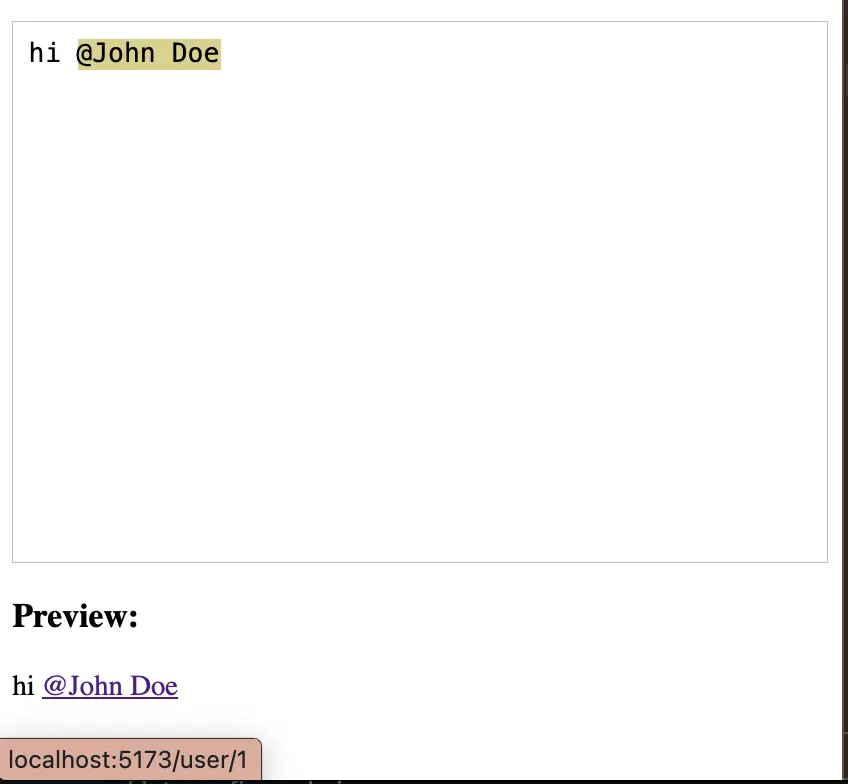
With this setup, we have successfully added the mentions feature in our React app and displayed it correctly in the preview. In the next sections, we will deep dive into advanced concepts which you must follow to implement the mentions and hashtags in a production React app.
Fetching mention suggestions from an API
In the previous sections, we have been using hard-coded users array for showing the suggestions list, but in a real world application, you must be using a web service to get the data.
If you don’t have an API URL for testing, feel free to use [https://hashtags-and-mentions-server.vercel.app](https://hashtags-and-mentions-server.vercel.app/).
const [users, setUsers] = useState<User[]>([])

useEffect(() => {
  (async () => {
    try {
      const res = await axios.get(`${API_URL}/api/users`)
      setUsers(
        res.data.users.map((user: { name: string, _id: string }) => ({
          id: user._id,
          display: user.name,
        }))
      )
    }
    catch (error) {
      console.error(error)
    }
  })()
}, [])
Fetching suggestion dropdown list asynchronously while typing
One of the best practices when calling a web service is to ask only what you need, that makes it fast, efficient and improves UX.
In this section, we will understand how to fetch the suggestion dropdown data asynchronously as the user types.
In the Mention component, instead of passing the users as array, you can pass a function to fetch the data. This function receives two arguments, query and callback, the query contains the input by user, and the callback is supposed to be called after our processing.
In this hands-on example, let’s change the trigger to # and try to load the hashtags asynchronously.
import axios from 'axios'
import { useCallback, useMemo, useState } from 'react'
import { Mention, MentionsInput } from 'react-mentions'
import './App.css'

const API_URL = 'https://hashtags-and-mentions-server.vercel.app'

function App() {
  const [value, setValue] = useState('')

  const asyncTags = useCallback(
    (
      query: string,
      // eslint-disable-next-line @typescript-eslint/no-explicit-any
      callback: any
    ) => {
      if (!query)
        return

      axios
        .get(`${API_URL}/api/tags/search?name=${query}`)
        .then((res) => {
          if (res.data?.tags?.length) {
            const suggestion = { id: query, display: query }
            const tagsArray = res.data.tags.map((tag: { name: string }) => ({
              id: tag.name,
              display: tag.name,
            }))
            return [...tagsArray, suggestion]
          }

          return [{ id: query, display: query }]
        })
        .then(callback)
    },
    []
  )

  const handleChange = (e: {
    target: {
      value: string
    }
  }) => {
    setValue(e.target.value)
  }

  const formattedInput = useMemo(() => {
    let formatted = value

    // format hashtags
    formatted = formatted.replace(
      /#\[(.+?)\]\((.+?)\)/g,
      (_, display) => `<a href="/tag/${display}">#${display}</a>`
    )

    return formatted
  }, [value])

  return (
    <div>
      <h1>Mentions and Hashtags in React</h1>
      <MentionsInput
        className="mentions"
        value={value}
        onChange={handleChange}
        placeholder="What's on your mind?"
      >
        <Mention
          className="mention"
          trigger="#"
          data={asyncTags}
          displayTransform={(_: string, display: string) => `#${display}`}
          markup="# [__display__](__id__)"
          appendSpaceOnAdd
        />
      </MentionsInput>

      <h3>Preview:</h3>
      <div
        dangerouslySetInnerHTML={{
          __html: formattedInput,
        }}
      />
    </div>
  )
}

export default App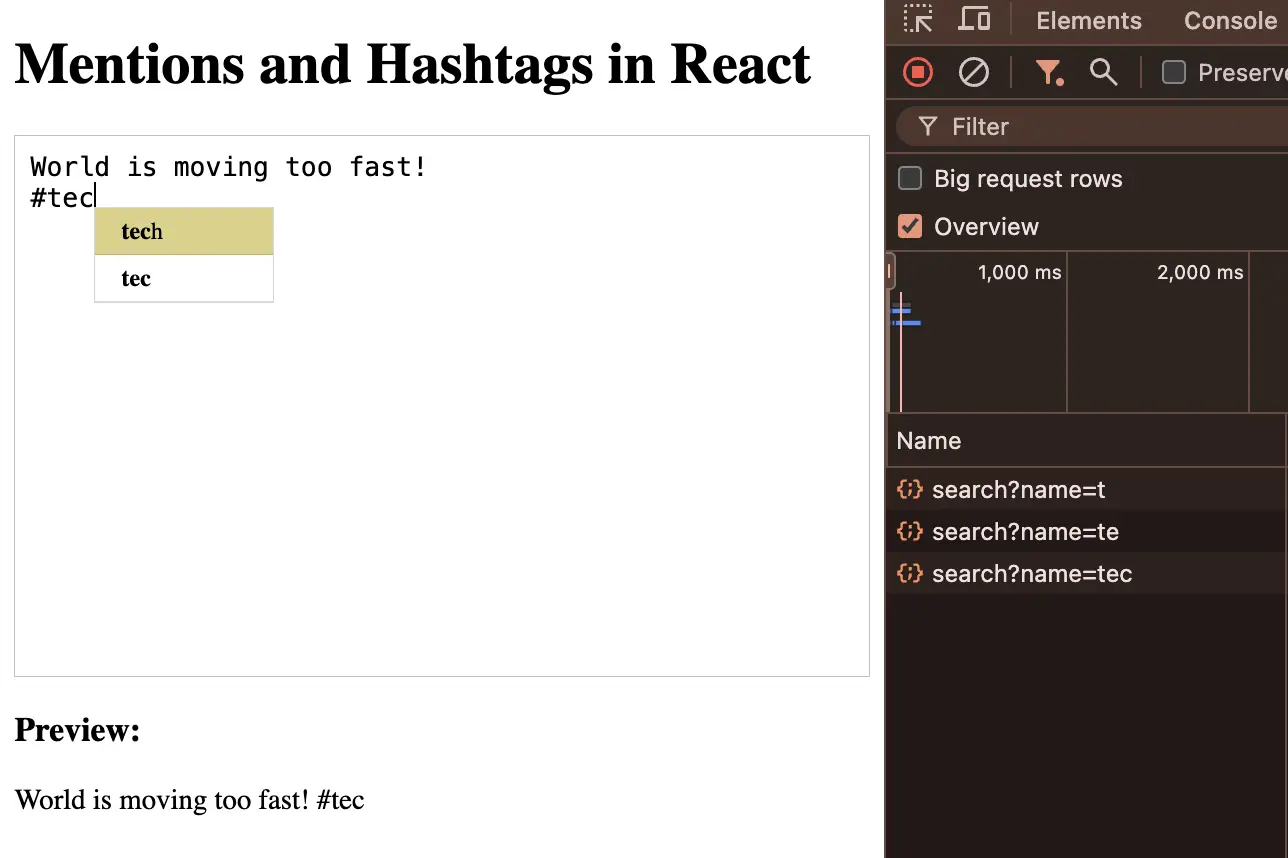
In the screenshot above, you can see that the API calls are being made as the user types and the list keeps filtering based on the input.
Debounce API call
In the previous section, we achieved displaying the suggestion list based on the user’s input, but there is a major issue with that implementation which is the number of API calls being made on each keystroke. This overloads the server with unnecessary requests and is a bad pattern for a production application.
We can fix this using a concept called debouncing, which basically holds a function for a given time and it only allows the function to execute if that time is passed, but if the user interrupts the timer by pressing a new key, the timer resets, and the function is again on hold. This approach improves the UX, keeps our app lightweight and saves server resources.
const timerRef = useRef<ReturnType<typeof setTimeout> | null>(null);

const asyncTags = useCallback(
  (
    query: string,
    // eslint-disable-next-line @typescript-eslint/no-explicit-any
    callback: any
  ) => {
    if (!query) return;

    if (timerRef.current) {
      clearTimeout(timerRef.current);
    }

    timerRef.current = setTimeout(() => {
      axios
        .get(`${API_URL}/api/tags/search?name=${query}`)
        .then((res) => {
          if (res.data?.tags?.length) {
            const suggestion = { id: query, display: query };
            const tagsArray = res.data.tags.map((tag: { name: string }) => ({
              id: tag.name,
              display: tag.name,
            }));
            return [...tagsArray, suggestion];
          }

          return [{ id: query, display: query }];
        })
        .then(callback);
    }, 500);
  },
  []
);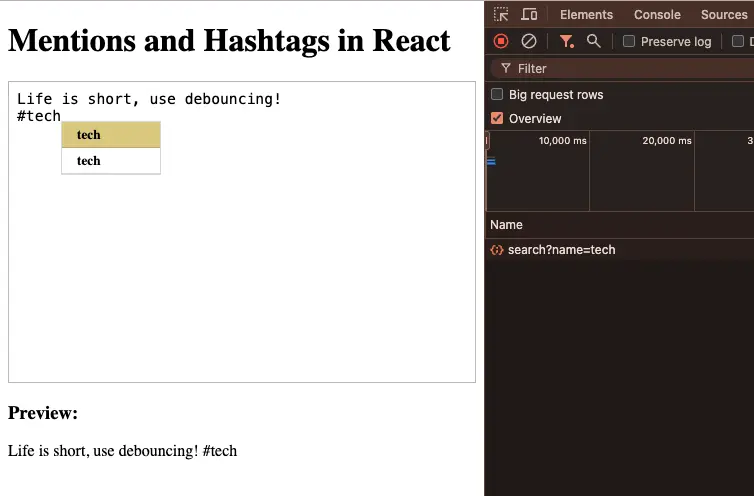
In the screenshot above, you will notice that API calls are no longer spammed and the API request is only sent when the user stopped typing for 500 ms.
Saving new hashtags to database
In our app, the users to mention are coming from database and they are fixed, means the user can not be created while typing but hashtags can be used from the database or the user can add new hashtags. These new hashtags must be added to the database so that they appear in the suggestions list if used again.
To handle this, you can use onAdd prop from Mention component. This callback function receives the hashtag which was added, you can store this in local state and when the user clicks submit button, just save these hashtags to database.
Tip: Use Set to keep the unique hashtag values in array.
import axios from "axios";
import { useCallback, useEffect, useRef, useState } from "react";
import { Mention, MentionsInput } from "react-mentions";
import "./App.css";

function App() {
	// ... existing code
  const [hashtags, setHashtags] = useState<string[]>([]);

  const onAddHashtag = (hashtag: string | number) => {
    setHashtags((prev) => [...prev, String(hashtag)]);
  };

  const onSave = () => {
    // save added hashtags to db
    axios.post("/hashtags", { hashtags });

    // save post to db
    axios.post("/post", { value: formatInput() });
  };

  return (
    <div>
      <h1>Mentions and Hashtags in React</h1>
      <MentionsInput className="mentions" value={value} onChange={handleChange} placeholder="What's on your mind?">
        <Mention
          trigger="#"
          data={asyncTags}
          displayTransform={(_: string, display: string) => `#${display}`}
          markup="# [__display__](__id__)"
          appendSpaceOnAdd
          onAdd={onAddHashtag}
          style={{ backgroundColor: "#dcd185" }}
        />
      </MentionsInput>

			<h3>Preview:</h3>
      <div
        dangerouslySetInnerHTML={{
          __html: formattedInput,
        }}
      />

      <button onClick={onSave}>Submit</button>
    </div>
  );
}

export default App;
Safely render HTML using dompurify and html-react-parser
When displaying user-generated HTML in your React app, it’s important to protect against Cross-Site Scripting (XSS) attacks and ensure that links are correctly rendered as Link component from react-router-dom.
There are two well maintained libraries which we will use and the code snippet on how to do it.
- dompurify: Cleans user entered HTML preventing XSS attacks.
- html-react-parser: Converts sanitized HTML into React elements (like converting
<a>tag to<Link>).
npm install dompurify html-react-parserimport axios from "axios";
import DOMPurify from "dompurify";
import parse, { domToReact, Element, type DOMNode } from "html-react-parser";
import { useCallback, useMemo, useRef, useState } from "react";
import { Mention, MentionsInput } from "react-mentions";
import { Link } from "react-router-dom";
import "./App.css";
const API_URL = "https://hashtags-and-mentions-server.vercel.app";
function App() {
const timerRef = useRef<ReturnType<typeof setTimeout> | null>(null);
const [value, setValue] = useState("");
const asyncTags = useCallback(
(
query: string,
// eslint-disable-next-line @typescript-eslint/no-explicit-any
callback: any
) => {
if (!query) return;
if (timerRef.current) {
clearTimeout(timerRef.current);
}
timerRef.current = setTimeout(() => {
axios
.get(`${API_URL}/api/tags/search?name=${query}`)
.then((res) => {
if (res.data?.tags?.length) {
const suggestion = { id: query, display: query };
const tagsArray = res.data.tags.map((tag: { name: string }) => ({
id: tag.name,
display: tag.name,
}));
return [...tagsArray, suggestion];
}
return [{ id: query, display: query }];
})
.then(callback);
}, 500);
},
[]
);
const handleChange = (e: {
target: {
value: string;
};
}) => {
setValue(e.target.value);
};
const formattedInput = useMemo(() => {
let formatted = value;
// format hashtags
formatted = formatted.replace(
/#\[(.+?)\]\((.+?)\)/g,
(_, display) => `<a href="/tag/${display}">#${display}</a>`
);
return formatted;
}, [value]);
const sanitizedValue = useMemo(() => {
return DOMPurify.sanitize(formattedInput);
}, [formattedInput]);
const parsedContent = parse(sanitizedValue, {
replace: (domNode) => {
if (domNode.type === "tag" && domNode.name === "a") {
const el = domNode as Element;
const href = el.attribs.href;
const children = domToReact(el.children as DOMNode[]);
return <Link to={href}>{children}</Link>;
}
},
});
return (
<>
<h1>Mentions and Hashtags in React</h1>
<MentionsInput
className="mentions"
value={value}
onChange={handleChange}
placeholder="What's on your mind?"
>
<Mention
className="mention"
trigger="#"
data={asyncTags}
displayTransform={(_: string, display: string) => `#${display}`}
markup="# [__display__](__id__)"
appendSpaceOnAdd
/>
</MentionsInput>
<h3>Preview:</h3>
{parsedContent}
</>
);
}
export default App;The final version of the code snippet can be found on GitHub here https://gist.github.com/gauravadhikari1997/3aeb6a38b990fa1169c80b64609e5241
Once you’ve mastered @mentions and #tags in React, take your skills further by building one of these React Project Ideas for 2026.
I hope this guide helps you understand the react-mentions library and how add mentions or hashtags to your own React apps with proper types.
Frequently Asked Questions
What is the react-mentions library used for?
react-mentions is a lightweight React component for adding @mentions and #hashtags functionality inside textarea or input. It provides a suggestions dropdown and handles insertion, formatting, and styling of mentions.
How do I install react-mentions in my React project?
Run npm install react-mentions or yarn add react-mentions. Then import { MentionsInput, Mention } from react-mentions and use them inside your React component.
How do I add @mentions support with react-mentions?
Wrap your textarea with <MentionsInput> and include a <Mention trigger='@' data={users} />. The data prop can be a static array of { id, display } objects or a function that fetches suggestions dynamically.
Can I also implement #hashtags using react-mentions?
Yes. Add another <Mention trigger='#' data={tags} /> to handle hashtags separately. You can configure its styling, formatting, and API source independently from @mentions.
How do I customize how suggestions look in react-mentions?
Use the renderSuggestion prop on the <Mention> component to render custom JSX, such as showing an avatar or role alongside the username.
What is the purpose of the markup property in react-mentions?
The markup prop defines how mentions are stored in the raw value (e.g., @[__display__](__id__)). This makes it easier to extract IDs and safely reconstruct mentions later for previews or saving to the database.
How do I fetch suggestions from an API in react-mentions?
Instead of passing a static array to data, provide a function (query, callback) that makes an API call and returns results to the callback. This enables search-as-you-type suggestions.
How can I prevent too many API calls in react-mentions?
Use debouncing with setTimeout and clearTimeout in your data fetch function. This ensures the API is only called after the user pauses typing, reducing server load.
How do I style the mentions and suggestions dropdown?
react-mentions provides BEM-style class names like .mentions__suggestions__list and .mentions__suggestions__item. You can override these in your CSS or pass className props for custom styling.
Is it safe to render raw mention markup directly?
No. Always sanitize before rendering with libraries like DOMPurify to prevent XSS attacks. You can then parse sanitized HTML with html-react-parser and convert <a> tags into React Router <Link> components.
Can I prefill react-mentions with existing mentions?
Yes. Store the raw value with markup format in your database. When reloaded into <MentionsInput>, react-mentions will render mentions correctly in the input.
How do I capture new hashtags typed by users?
Use the onAdd prop of <Mention trigger='#'>. This callback provides the added tag, which you can store in local state and later persist to your database.
WorkSage Hybrid Work Planner is a web based scheduling tool built for people working in hybrid mode (some days from home, some from office). It helps you plan and balance your “work from office (WFO)” and “work from home (WFH)” days according to what your workplace requires.
Try it now for free →